Flow Writer Instructions
Quick Start
If this is your first time using Flow Writer, follow these steps to create your first Flowtocol procedure.
- 1. Click the blue More icon in the upper left hand corner and then select New Flowtocol.
- 2. Enter a short title, such as My First Flowtocol, to explain the purpose of the procedure. Then click Create.
- 3. Enter an instruction in the gold instruction cell. Type This is my procedure.
- 4. Move one cell to the right then type OK and press Enter. Click the blue Update button.
- 5. A new row is created in the table. Type the second instruction in the gold cell – What direction are you heading?
- 6. Enter four directions – North, South, East, West – under Outcomes 1 through 4. Be sure to hit Enter when finished typing. Click the blue Update button.
- 7. Complete the procedure by typing in Canada, Mexico, Atlantic, and Pacific in the Instruction column.
- 8. The table should now look like

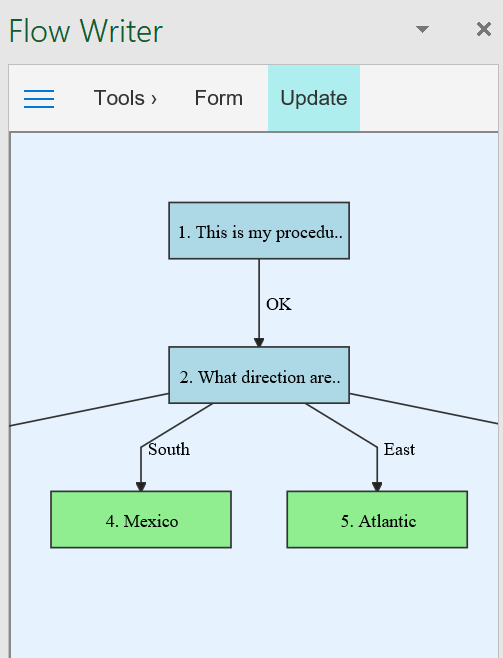
- 9. The app pane should display a simple flowchart.
- 10. You have just created a very simple Flowtocol procedure. Let’s turn it into a web page that you can send to your friends or post on your website.
- 11. Click the blue More icon in the upper left hand corner and then select Create Web Page.
- 12. You can now pick a web page style. Click Mobile Friendly.
- 13. Open the file that is created and run your procedure in a browser.
Using the Map
The map is a visual flowchart representation of your procedure. Procedures can get quite complex and flowcharts are very useful when creating Flowtocols. When you click on a step in the Excel table, the map highlights the selected step. Conversely, if you click on a step in the map, that step is highlighted in the Excel table. Click Map in the toolbar to view the map.
The instruction text is clipped in the map. But if you hover over a step, the full instruction text is displayed.
The app pane is not big enough to show the entire flowchart. You can drag the map around by holding the left mouse button and moving the mouse.
Using the Form
You may find it more convenient to edit your Flowtocol using a form rather than the map view. Click Form in the toolbar to switch to this view. You can enter the instruction, outcome and HelpLink text in the form. Click the blue Update to save the information and create new steps from the outcomes.
Click the blue Glasses Icon to preview any HelpLink that you entered. The blue Arrow Icon will move you to the step that the outcome is directed to. The blue Trashcan Icon allows you to the delete the entire branch under the associated outcome.
Opening the Step Details pane reveals any sibling steps of the current step. You can click on a sibling to move the form and Excel table to that step. The Pathway reveals all the steps that get you to the current step. It is a convenient way to review what your users will encounter up to this point. Again, you can click on any step in the pathway to move the form and Excel table to it.
The form and Excel table always remain in sync with each other.
Creating Output Files
After you have created a Flowtocol procedure, you have several options to get it into the hands of your users.
Flowchart
You can simply create a flowchart as a web page that can be viewed with a web browser. Flowcharts are great ways to see the big picture as you design the procedure. If you have added HelpLinks to your step, a gold box will appear on the step. Clicking on the gold box opens the HelpLink in a new browser tab. The Flowchart creation option is available under the More Icon.
Web Page
You can turn your Flowtocol procedure into a single page web app, again available under the More Icon. Click Create Web Page. Four web page style options are available:
Mobile Friendly: This is the best choice for smartphone displays. It has a compact display of the procedure.
Pop-Up HelpLinks: If your procedure has HelpLinks that are not from your website, this is probably the best choice. But the user may have to provide permission for pop-ups, so this may not be a great option if you are posting on your website.
Framed HelpLinks: HelpLinks are displayed in a frame within the webpage. This is the best user experience, but unfortunately some web pages will not allow themselves to be rendered in a frame. This will not be a problem for URLs coming from your website.
No HelpLinks: If your procedure does not use HelpLinks, this style shows the activity log next to the procedure.
There are a number of options to use the web page.
- – Email it to colleagues. When they open the attachment it will render within their default web browser.
- – Post it on your company intranet, SharePoint server, or even a network folder.
- – Post it on your company website.
Excel Worksheet
The simplest, and most powerful, option is to simply send out the Excel workbook to your colleagues. They will need to download the Flow Reader app to have the Flowtocol procedure render in the app frame. But all their records are stored in the spreadsheet allowing them to create activity reports, save records for later completion, or pass the record off to another colleague for completion.
You can analyze the records, as described below, to understand the selections that your users make and capture any comments they enter.
Adding HelpLinks
A HelpLink provides a way to add other web-based information sources to each step such as:
- – Company product pages
- – PDF instruction manuals, linked directly to the pertinent page
- – Intranet information sources like WikiPedia
- – YouTube videos
HelpLinks can also be used as a simple workflow utility. You can create a HelpLink that automatically fires up the user’s email program. You can set the recipient email address, subject line, and message body.
Using Editing Tools
All of the steps below support an Undo button in case the operation does not do what you intended. An Undo arrow will appear in the upper right hand corner of the menu bar after the operation is performed. Check the edit operation to make sure it is correct. Click Undo before performing any other edits as they will clear the undo option.
Insert Above
Sometimes when you create Flowtocol procedures, you will find that you forgot a step. Simply select the step you that you wish to add a new step above and click Insert Above under Tools. If there are multiple parents pointing to this step, you will need to specify where to insert the new step.
Note: You cannot insert a step above Step 1.
Rewire Steps
Occasionally you may create a complex Flowtocol procedure and then decide that the order must be changed. A set of steps at the bottom should be moved up to the middle, for example. For these situations, you will want to use the rewire steps utility.
Rewiring more than a couple of steps can be confusing to do. We therefore recommend that you write a list of all the changes before performing.
Parent |
Current Child |
New Child |
| 1 | 3 | 10 |
| 11 | 14 | 3 |
| 12 | 15 | 3 |
Now with your list in place, click Rewire Steps. The map background turns tan to show you are in rewire mode. Click the label that you want to rewire. Then click the new child step that you want the label to point to. The connection will disappear. You can repeat the process of clicking labels and new destinations until you have finished your list. Click OK when you are ready to see the changes. The map will be redrawn. If this is not what you intended, click the Undo button.
Note: If the rewire process orphans any steps, they will appear in red at the top of the map. You can either delete the orphaned steps or wire it back into your procedure.
Copy Branch
Many Flowtocol procedures have branches that are very similar. Instead of retyping each branch, it may be easier to copy a branch and it. Click Copy Branch under Tools. The map will be displayed highlighting the branch that will be copied. Click the destination step.
Note: A branch cannot have more than 10 outcomes. The copy utility will clip any outcomes above the maximum.
Move Branch
You can also move a branch from one location to another. Click Move Branch under Tools. The map will be displayed highlighting the branch that will be moved. Click the destination step.
Note: A branch cannot have more than 10 outcomes. The move utility will clip any outcomes above the maximum.
Delete Branch
You can delete a branch by clicking Delete Branch under Tools. The map will be displayed highlighting the branch that will be deleted. Confirm the deletion if you want to proceed.
Redirecting Steps
Sometimes a procedure needs to a loop back up to a previous step or be directed to a different branch. Flow Writer supports step redirection. You can either perform this with the rewire utility described above or through the form. Follow these instructions to redirect a step in the form.
- Go to Map view.
- Write down the destination step number.
- Click the parent step in the flowchart.
- Go to Form view.
- Add the destination step number that you wrote down next the appropriate outcome.
- Click Update.
- Go back to Map view and make sure the link is correct.
Analyzing Flowtcol Records
If your users are using the Flow Reader app to enter Flowtocol records into Excel, you can analyze the records that they create. Typically you will either post a copy of your Excel workbook on your company Intranet or email it to them. You will then bring back these Excel workbooks and analyze the records.
Click Analyze Records under the More icon. Two things will then be created. First, a new sheet will be added in the Excel workbook that lists all the records that were created. This includes that date the record was started and the tag, if one was entered. All the step numbers they clicked are listed, as well as the final step. If they entered any comments, they are listed in separate columns.
The second thing that is created is a web page that displays an annotated flowchart. It shows the click count of each path. For example, if you had a step with a simple ‘Yes/No’ response, it might show that 60% of people entered ‘Yes’, 35% entered ‘No’, and 5% terminated the procedure without answering anything. This analysis provides valuable insight for you and others in your organization.
Fixing Broken Links
If the Flow Writer add-in is active, it will not allow you to enter IDs in the spreadsheet. It generates them automatically. But a user could overwrite them if the add-in is not active. In that case, you can follow this procedure to fix a broken link.
- Go to Map view.
- Write down the ID of the broken step. It will be highlighted in red.
- Look for its parent step and click it.
- Go to Form view.
- Add the broken step ID in the appropriate outcome ID box.
- Click Update.
- Go back to Map view and make sure the link is correct.
FAQs
| The Update button does not work. | Excel will not allow the Update button to work if you are editing a cell. Either press ENTER when finished typing or move to another cell. |
|---|